
CALENDAR ICON

Make a new document in Photoshop. I’ve made mine 100×100 pixels.Making sure you’re working on a blank layer, grab the Rectangular Marquee Tool. Holding down Shift, drag out a square.

Fill the square with any colour. We will be adjusting this layer with Blending Options.

Select Blending Options for this layer.
Select Inner Shadow. Set the blend mode to Normal.

Select Gradient Overlay. Create a subtle light gray – near white gradient. Set the angle to 127 degrees.

Select Stroke. Set the size to 1 px, and the colour to a dark red.

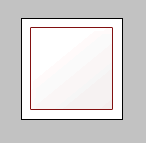
Select OK. This is what your calendar should look like so far:
Make a new layer. Ctrl-click the first layer (to select it).

Using the Rectangular Marquee Tool, hold down alt while dragging a rectangle over the bottom portion of the calendar.

This will leave you with just the top part of the canvas selected. Once again, fill this layer with any colour. We’ll adjust it in Blending Options.

Go to Blending Options. Select Inner Shadow. Change the Blend Mode to Normal, and select a light red/pink.

Select Gradient Overlay. Create a subtle dark – light red gradient. (If you’re dealing with lighter colours, you may also want to apply a 1 px stroke).

This is how your icon should look so far:

Now head on over to the next page to learn how to add a shine to your calendar.


.jpg)
.jpg)


No comments:
Post a Comment